Hello once again, welcome to yet another edition of Fun To Read Blogs! This fourth edition will be dealing with something outside of the video game world. It deals with the ancient art of origami, but called the 3D Lucky Star! For those of you that have no idea about the lucky star, apparently the old legend said that you would write a wish on a strip, make the star, and hope the wish comes true. However, today, the stars can be given in a creative jar to a person whom you may have feelings for. Let’s get into my journey making these lucky stars shall we?
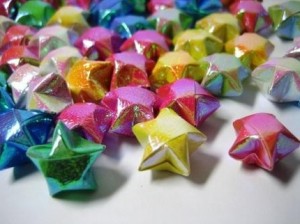 Okay then, it’s a mildly sunny morning in southern California as I write this little blog. Let’s talk about my journey with these creative little stars! My big brother bought a ton of packs to make stars for a friend’s birthday gift. He made all of these amazing stars, too. So hear I am on the sidelines, moaning about how they look so awesome! I was scared to try, and I took my hand on the star. The first 2 hours, I made no progress whatsoever, and I was really upset. My brother then taught me his method, which helped me a little bit, but I was still very inconsistent, only succeeding to make deformed shapes, with a star every so often. All of a sudden, from out of the blue, I decided to practice my hand on graph paper and construction paper. I had no idea why I did this, but holy crap, it worked! I got really beautiful stars with very distinctive shapes! I then decided to take a couple of strips from my brother’s pile of unmade stars and then poof, perfect stars! I was quite stunned! I had really come a long way. Hours before, I hadn’t even been able to fold the little thing. Now, I became very consistent and did this easily! Yesterday afternoon: my brother heads off to work. Poor chum. I decided to take a TON of star strips. I began making them as I typed yesterday’s blog article about Phoenix Wright fanboy games. As I typed, I was able to make many stars effortlessly. My new pinching method that gave stars the very distinctive shape worked really well, but made my fingers sore. So, here I sat making these stars, for 4 HOURS, with a 30 minute dinner break. My brother comes home from work, and I was seriously thrilled. I plowed through an entire PACK of 100 stars in this time. So when he comes home, I told him to pick a “few” stars and to not be picky. He pulled a WTF on me and asked how my stars became so perfect. He even confessed that mine were better than his. He seriously stared at mine and kept wondering how I got such a perfect shape. When I get a better camera, I’ll be sure to post pictures of my star collection that I made. I dunno when that will be.
Alright guys, that concludes my fourth edition of Fun To Read Blogs. Thanks so much for reading about my random stuff. Once again, feel free to post comments and feedback on how I can improve from here. I look forward to reading them. And, you can PM me here, on GBATemp (shadowhunter93), or email me. I really hoped you enjoyed it and like I always said, until next time!…(maybe later today or tomorrow?) Beats me. Maybe I can cram in another article about something after I get out of SAT class! Anyways, until next time! Stay tuned!
wow. I just realized I hit 600 words
Haha that’s pretty cool. You should put a tiny hole in each of them and string them all together. I think they do that too.
thanks, they take a long time. I just got another 3 pacS!!!
oh man i used to try to make like a bottle full
i get bored after 15mins
never finished haha